SSD201移植RTL8723du模块(蓝牙调试)
由于USB是默认配置好的,那么我们只需要对模块单独配置就可以了。
1、将获取的RTL8723du模块驱动程序拷贝至kernel/drivers/bluetooth/rtl8723du/目录下

2、在rtl8723du目录下添加Kconfig
# vi kernel/drivers/bluetooth/rtl8723du/Kconfig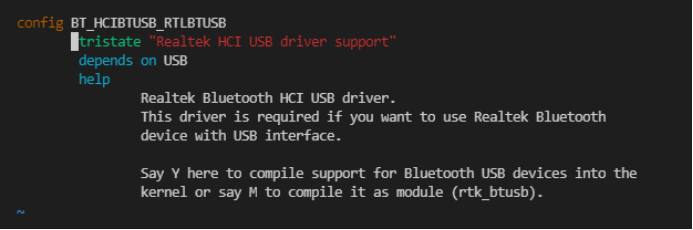
config BT_HCIBTUSB_RTLBTUSB
tristate "Realtek HCI USB driver support"
depends on USB
help
Realtek Bluetooth HCI USB driver.
This driver is required if you want to use Realtek Bluetooth
device with USB interface.
Say Y here to compile support for Bluetooth USB devices into the
kernel or say M to compile it as module (rtk_btusb).
3、在kernel/drivers/bluetooth/ 中添加RTL8723du配置文件路径:
# vi kernel/drivers/bluetooth/Kconfig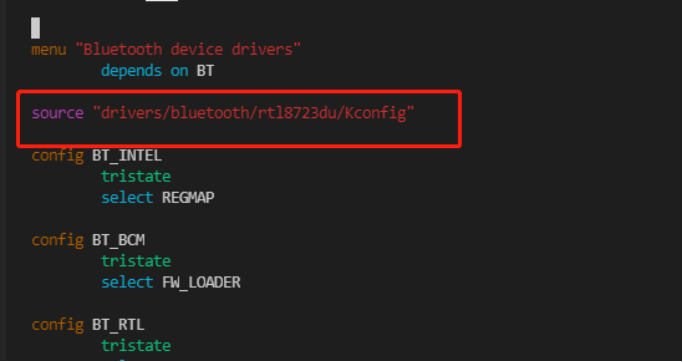
4、在kernel/drivers/bluetooth/Makefile 中配置编译RTL8723du驱动程序:
# vi kernel/drivers/bluetooth/Makefile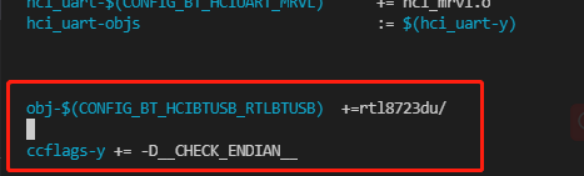
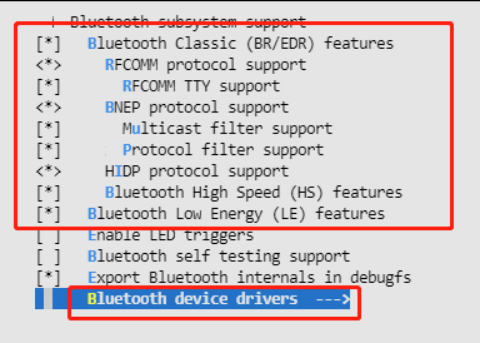
5、在kernel中开启RTL8723du模块(可以看到我们移植的环境生效了):
-*- Networking support --->
<*> Bluetooth subsystem support --->
Bluetooth device drivers --->
<M> Realtek HCI USB driver support
# cp .config arch/arm/configs/infinity2m_spinand_ssc011a_s01a_minigui_cz_defconfig
7、编译:
# /Release_to_customer.sh -f nand -p ssd202编译成功后kernel/drivers/bluetooth/rtl8723du/下会生成rtk_btusb.ko。

1、将驱动rtk_brusb.ko放置到/opt/下。

2、拷贝蓝牙固件至/lib/firmware目录(一般都会在驱动包中):
# mkdir –p /lib/firmware
3、配置模块启动脚本
# vi rootfs/etc/init.d/S31wlan#!/bin/sh
case "$1" in
start)
printf "Starting init wifi module: "
echo 47 > /sys/class/gpio/export
echo out > /sys/class/gpio/gpio47/direction
echo 0 > /sys/class/gpio/gpio47/value
sleep 0.1
insmod /opt/rtk_btusb.ko
[ $? = 0 ] && echo "OK" || echo "FAIL"
;;
stop)
printf "Stopping wifi: "
ifconfig wlan0 down
hciconfig hci0 down
rmmod rtk_btusb
[ $? = 0 ] && echo "OK" || echo "FAIL"
;;
restart|reload)
"$0" stop
"$0" start
;;
*)
echo "Usage: $0 {start|stop|restart}"
exit 1
esac
exit $?
4、安装蓝牙驱动:
# insmod rtk_btusb.ko
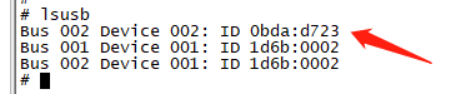
可以看到已经识别模块了:
因为蓝牙需要相应的指令进行控制,所以需要移植bluez获取。
移植方法可以参考:https://blog.csdn.net/wanguofeng8023/article/details/118392983
也可以用buildroot构建,这里用的是buildroot-2018.05,高版本的没带有gatt服务。
1、替换好编译的rootfs.tar.gz:


2、可以看到蓝牙有节点出来:
# hciconfig –a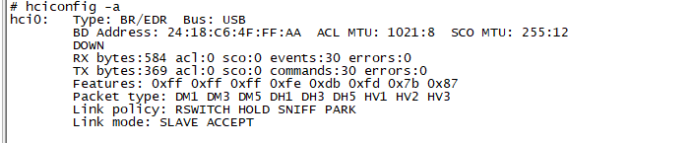
3、启动hci0:
# hciconfig hci0 up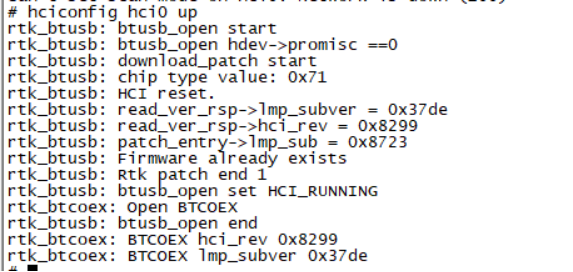
4、使蓝牙能搜索并能被搜索到:
# hciconfig hci0 piscan
5、搜索远程蓝牙设备:
# hcitool scan
可以看到能搜索到远程的蓝牙了。
手机上也能搜索到了:
6、我们可以尝试ping一下远程的蓝牙设备是否能通:
# l2ping 60:AB:67:28:7F:B8
成功ping通。
1、系统启动后创建dbus用户
# adduser dbus2、开启dbus服务
# /etc/init.d/S30dbus start3、运行bluetoothd服务
# bluetoothd -n -d --compat --plugin=time --experimental &4、执行gatt服务
# /usr/lib/bluez/test/example-gatt-server &5、
hciconfig hci0 up6、
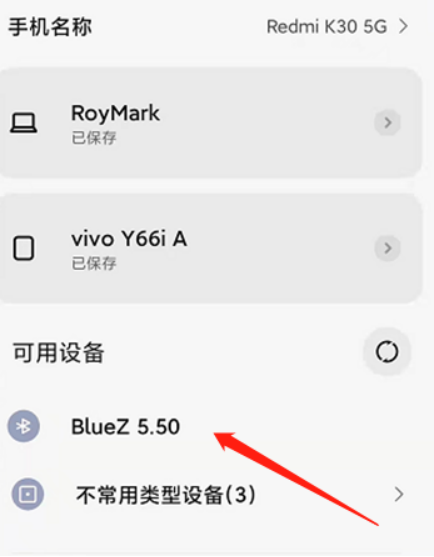
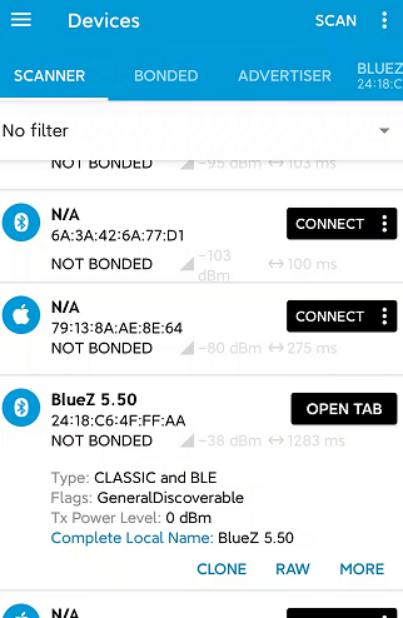
hciconfig hci0 leadv7、手机打开nrf connect软件,找到BlueZ 5.50设备并连接
8、切换到client页面,并点击开启模拟电量播报服务
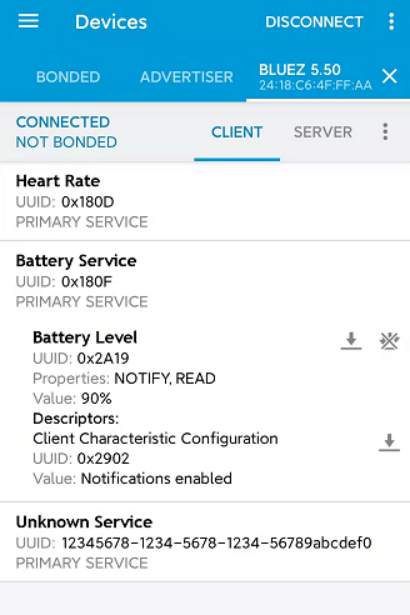
9、板子串口可以看到电量播报信息了。

10、把/etc/passwd和/etc/shadow中的dbus信息复制到rootfs.tar.gz里的对应文件,并把3-6步写到一个脚本中:
# vi etc/bluetooth_up.sh
#!/bin/sh
        bluetoothd -n -d --compat --plugin=time --experimental &
        sleep 1
        /usr/lib/bluez/test/example-gatt-server &
        sleep 3
        hciconfig hci0 up
        hciconfig hci0 leadv
        echo -n "------------- bluz service start "
        echo -e "\033[32m[OK]\033[0m ------------"
系统启动只需要执行该脚本,即可开启bluez服务。
前往“发现”-“看一看”浏览“朋友在看”